Post-Installation Steps
Now that Simple SMS has been successfully installed follow these steps to get up and running.
Add Buttons and Fields
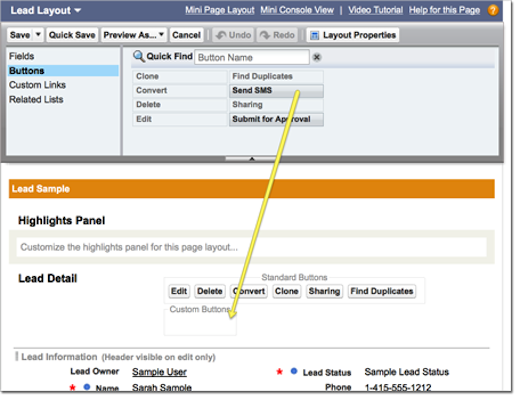
Simple SMS comes packaged with two Send SMS buttons – one for Leads and one for Contacts. You can easily create a button for your Account, Opportunity, Case, and Custom Objects.
First, add the Lead button shown below to the Custom Button section on your page layout.
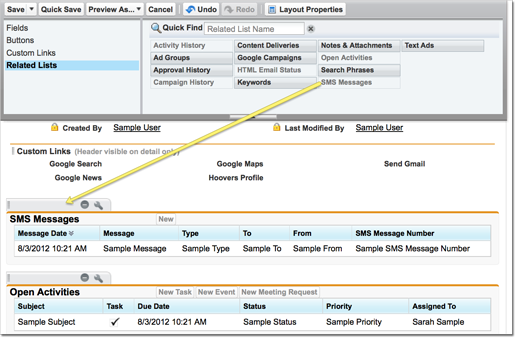
Then, add the field shown below to your page layout. You can add it anywhere you see fit.
Add Related List for SMS Messages
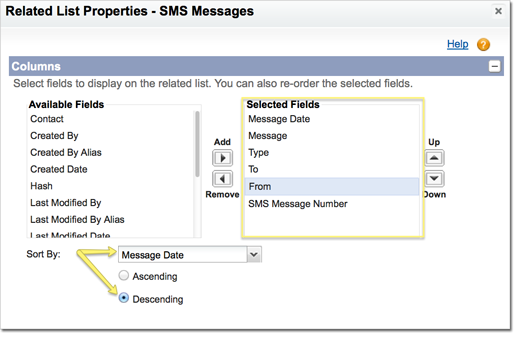
Add and configure the SMS related list as show below.
That’s all the setup for Leads. Repeat these exact steps to add the button, field, and related list to your Contact page layout(s).
Setup a Twilio Account
If you have a Twilio account, skip below to the section titled “Enter Your Twilio Credentials”. If not, it’s easy to get started, just keep reading and follow the next several steps.
- Go to http://www.twilio.com/try-twilio. Complete the short form and click Get Started.
- Enter your phone number and Twilio will provide you with a pin. You’ll get an automated call from Twilio asking you to enter your pin. Once you do this, you’ll be logged into your account and given a trial phone number.
At this point you have a trial version of Twilio and can send SMS messages on a test basis. Using this trial account you can only send SMS messages to the number that you entered in Step 2 above . It’s not practical to use this account for anything other than testing sending messages to yourself. If you’d prefer to do some testing just skip to the next section. Otherwise, go ahead and upgrade your account. Enter your credit card info and choose a starting amount to fund the account with. Each SMS message will deduct $.01 from your account ( for US based numbers ).
Enter Your Twilio Credentials in Salesforce
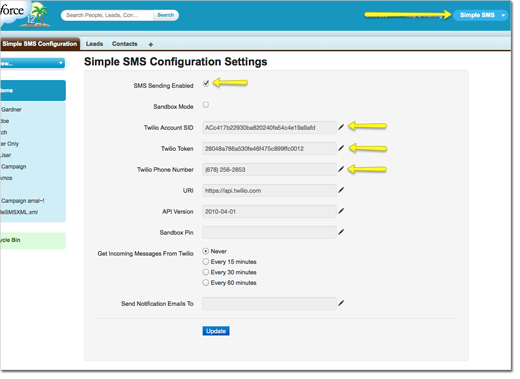
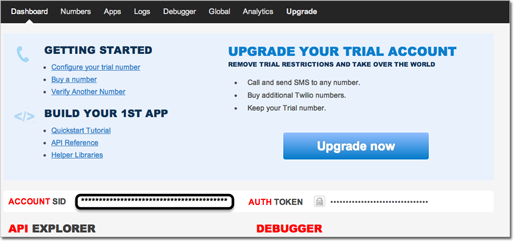
Back in your Salesforce org, go to the Simple SMS Configuration tab that’s found in the Simple SMS app. Copy your Twilio Account SID, Auth Token, and Phone Number from your Twilio account and paste them into the corresponding fields on the configuration page, as shown below. The URI and API Version fields should already be populated. Be sure to click the Update button to save your changes.
Now you’re ready to start sending messages to your Leads and Contacts.
The next section describes how to set up your system to handle incoming messages.
Setup Incoming Messages
Now that we can send messages, we want to be able to receive them.
For Group and Professional Edition users, you can schedule Simple SMS to retrieve your incoming messages every 15 minutes, 30 minutes, or 60 minutes. All new messages will be added to the appropriate Lead, Contact, Account, Opportunity, Case, or Custom object. On the configuration page shown above, select the interval you want and click Update .
For Enterprise and Unlimited users, you have an additional option for handling incoming SMS messages. Messages can be handled in real-time using a Force.com Sites page as described below.
Setting up Force.com Sites
If your org does not have a registered Force.com domain then visit this page in the Help & Training section on getting started with Force.com Sites. If you’re not sure if your org has a registered Force.com domain go to Setup => Develop => Sites to check.
Add a New Site
Assuming that your org has a registered Force.com domain name, you’re now able to set up your Site for handling incoming messages.
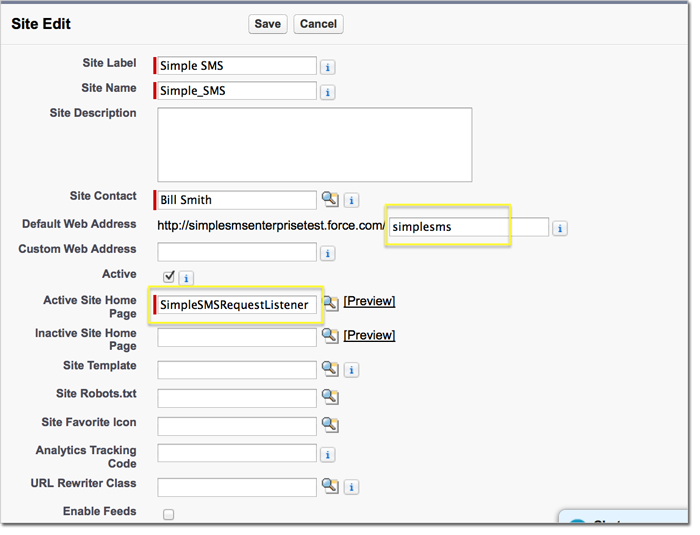
Go to Setup => Develop => Sites = > New. You’ll then see the following screen.
Give your Site a Label and select a Contact. The Label can be anything you want but we suggest calling it Simple SMS for clarity sake.
We suggest adding ‘simplesms’ to the Default Web Address.
Set the Active Site Home Page to the SimpleSMSRequestListener page.
Save.
Edit Public Access Settings
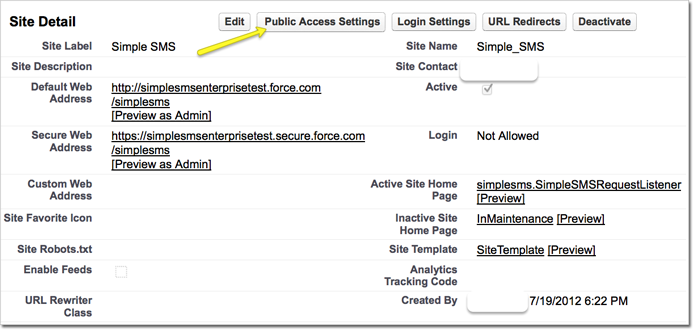
After saving your new Site, click the Site name to open the detail record and you’ll see the following screen. Click the Public Access Settings button to open the profile.
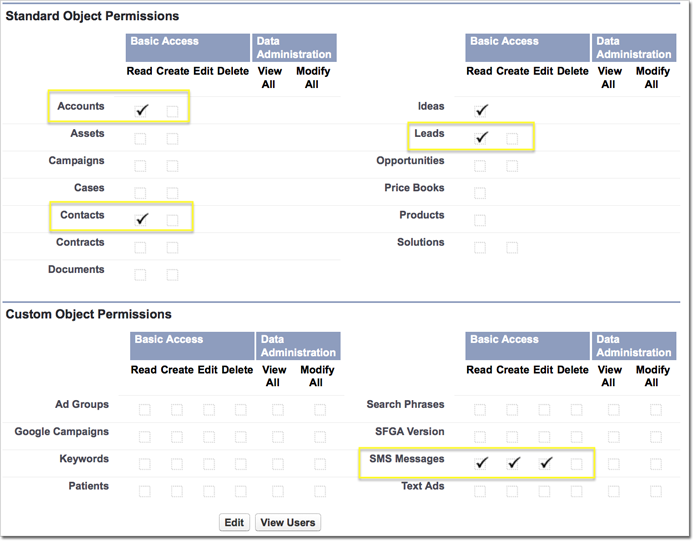
Add the following Object permissions to the profile.
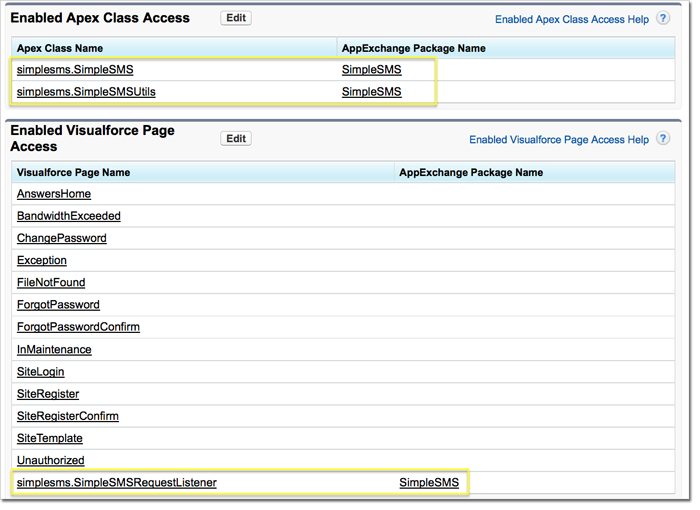
Add these Apex Classes and Visualforce Pages to the profile.
Add your Site URL to Twilio
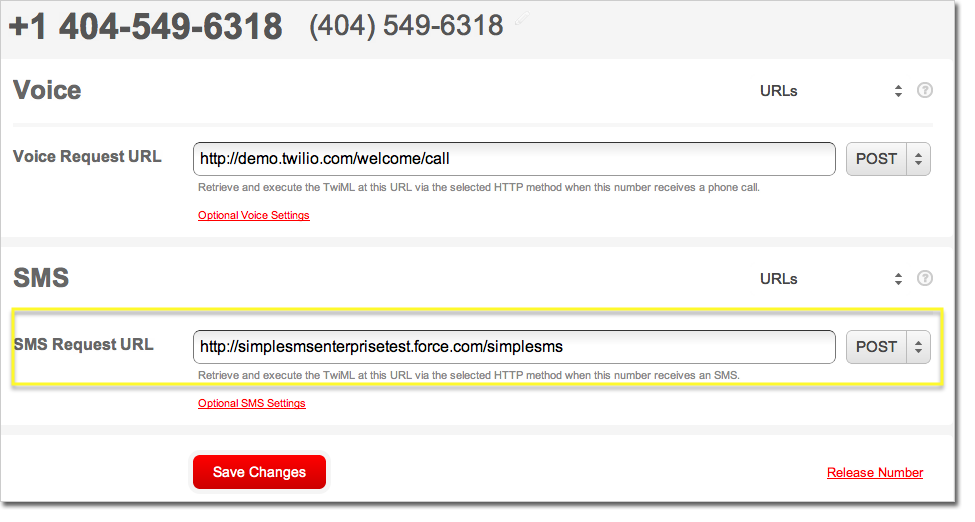
The last step is to add your Force.com Site URL to Twilio. This will send all of your incoming SMS messages to the Sites page.
Click on the Numbers tab, then on Twilio Numbers, then on your phone number.
Lastly, in the SMS section, enter your Force.com Sites web address. Ensure that you use http and NOT https. Click Save Changes.
Next Step – User Guide
Now that Simple SMS is fully configured to handle sending and receiving messages, proceed to the User Guide for more information.

